Lab 2 - Switch interfaces configuration
Lab instructions
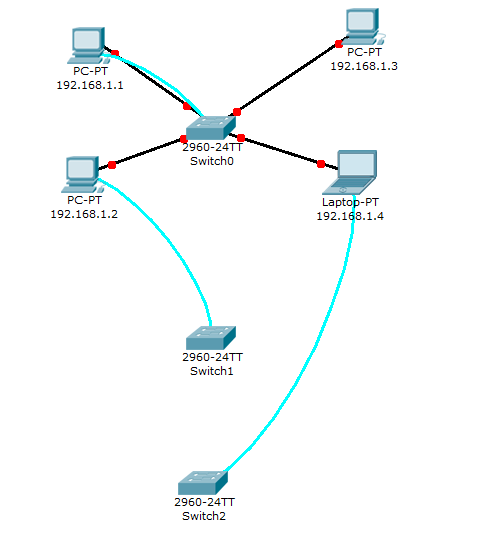
This lab will test your ability to configure speed, duplex, and vlan settings on a cisco switch interfaces.1. Connect to Switch0 using console interface and configure each Switch0 fastethernet switchport for operation. Correct settings are :
- Port type : access port
- Speed : 100 Mbit/s
- Duplex mode : Full Duplex
- Autonegotiation disabled
2. PC "192.168.1.4" seems to be unable to ping other PCs in the network. Check switch configuration.
TIP : How many broadcast domains are there in this network ?
3. Choose the right cable to connect :
- Switch0 gigabitethernet 1/1 to Switch1 gigabitethernet 1/1
- Switch1 gigabitethernet 1/2 to Switch2 gigabitethernet 1/2
4. Configure those two links as trunk lines without using trunk negotiation between switches
Network diagram
Solution
Connect to Switch0 using console interface and configure each Switch0 fastethernet switchport for operation.Switch(config)#interface FastEthernet0/1
switchport mode access
duplex full
speed 100
Switch(config)#interface FastEthernet0/2duplex full
speed 100
switchport mode access
duplex full
speed 100
Switch(config)#interface FastEthernet0/3duplex full
speed 100
switchport mode access
duplex full
speed 100
Switch(config)#interface FastEthernet0/4duplex full
speed 100
switchport mode access
duplex full
speed 100
duplex full
speed 100
Switch(config)#interface FastEthernet0/4
Switch(config-if)#switchport mode access
Switch(config-if)#switchport access vlan 1
Choose the right cable to connect :
- Switch0 gigabitethernet 1/1 to Switch1 gigabitethernet 1/1
- Switch1 gigabitethernet 1/2 to Switch2 gigabitethernet 1/2
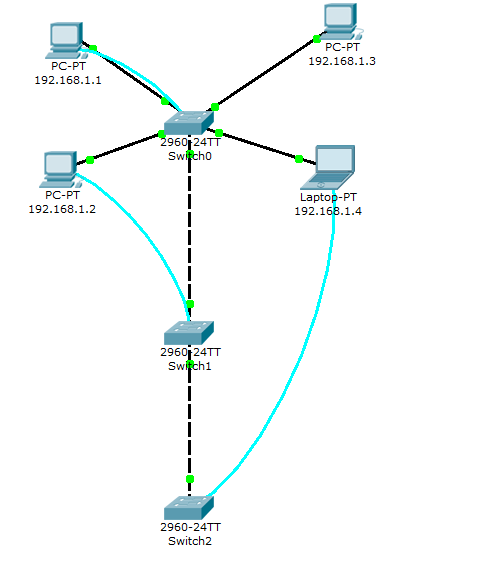
Configure those two links as trunk lines without using trunk negotiation between switches
On every interface that has to be configured for trunk operation, configure the following settings
Switch(config)#interface GigabitEthernet1/X
Switch(config-if)#switchport mode trunk
Verify interface operational mode using the "show interface GigabitEthernet1/X switchport command" :
Name: Gig1/2
Switchport: Enabled
Administrative Mode: trunk
Operational Mode: trunk
Administrative Trunking Encapsulation: dot1q
Operational Trunking Encapsulation: dot1q
Negotiation of Trunking: On
Access Mode VLAN: 1 (default)
Trunking Native Mode VLAN: 1 (default)
Voice VLAN: none
Another usefull ios command is "show interfaces trunk" :
Switch#sh interfaces trunk
Port Mode Encapsulation Status Native vlan
Gig1/2 on 802.1q trunking 1
Port Vlans allowed on trunk
Gig1/2 1-1005
Port Vlans allowed and active in management domain
Gig1/2 1
Port Vlans in spanning tree forwarding state and not pruned
Gig1/2 1